

My boss gave me the OK to build a ground station using AWS, and I jumped at the opportunity. I’d been wanting to get hands-on with satellite data for a while, and this was the perfect chance to see what it really takes to downlink, process, and visualize data from a real satellite, in this case, NOAA’s JPSS1.
I started by creating a folder on my machine for the project and cloning the GitHub repository provided by AWS:
🔗 Repo: https://github.com/aws-samples/aws-groundstation-s3-data-delivery.git
This repo contains everything you need to get started : Lambda functions, orchestration scripts, CloudFormation templates, and documentation for the entire setup.
Step 1: Creating a S3 Bucket
The first step was creating two S3 buckets . I created one to store software assets like scripts and Lambda package, and the other one for the actual satellite data that would be delivered via Ground Station.
I logged into the AWS Console, searched for S3, and clicked Create bucket. I named the first bucket something like ground-station-software-jd-12345 and made sure to select the same AWS Region where I would be scheduling contacts which is important for latency and data handling.
Then I repeated the process to create the second bucket, but this one had to start with aws-groundstation-. You can name it something like aws-groundstation-jpss1-data for example. AWS requires this naming format to use it with the S3 data delivery configuration.

Step 2: Uploading the Software Files
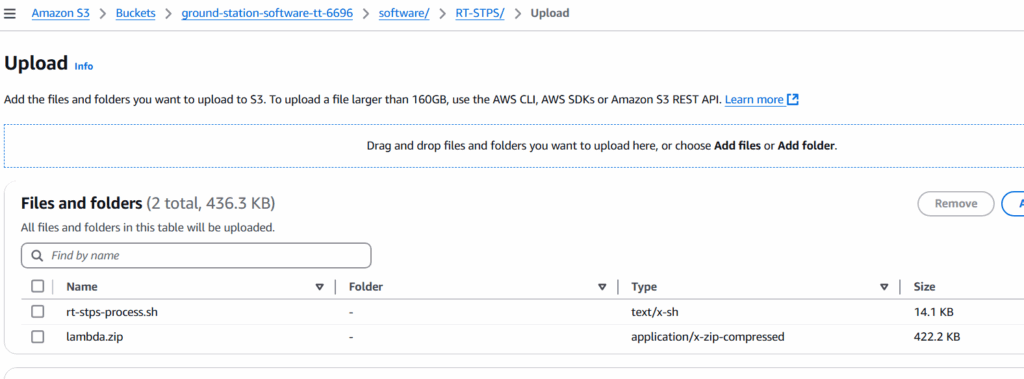
Next, I needed to upload a few files from the repo into the software bucket (ground-station-software-jd-12345). You can find the files needed in the rt-stps and ipopp folders of the repo I gave you.
Still in the S3 Console and inside my software bucket and created two folders:
- RT-STPS
- IPOPP
And just like in the repo I gave you, you upload the files accordingly.
In the IPOPP folder, upload the files:
- ipopp-ingest.sh
- install-ipopp.sh
Then in the RT-STPS folder, I uploaded the other set of files:
- lamba.zip
- rt-stps-process.sh
Step 3: Deploying the RT-STPS CloudFormation Stack
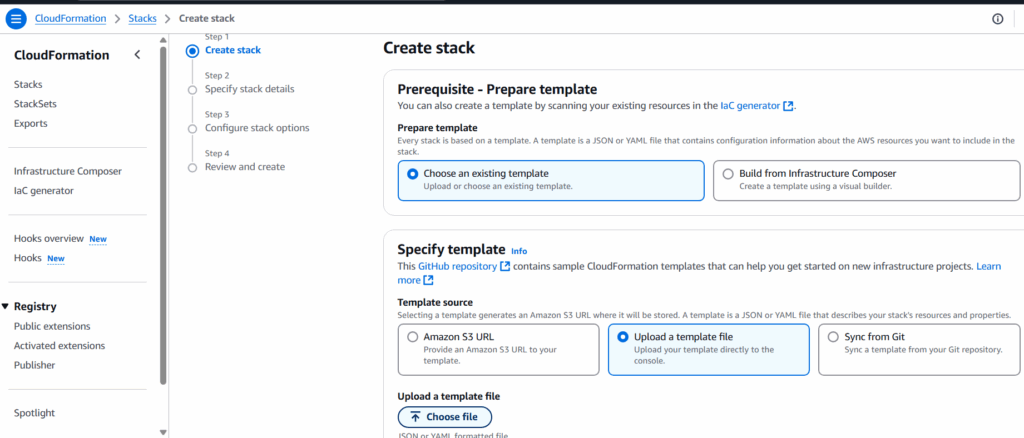
With the files uploaded, I switched over to the CloudFormation Console to deploy the RT-STPS instance and connect it to AWS Ground Station. I just searched for CloudFormation at the top left of the AWS console to get to it.
I clicked Create stack, Choose an existing template, selected Upload a template file, and uploaded the jpss1-gs-to-s3.yml template from the repo.
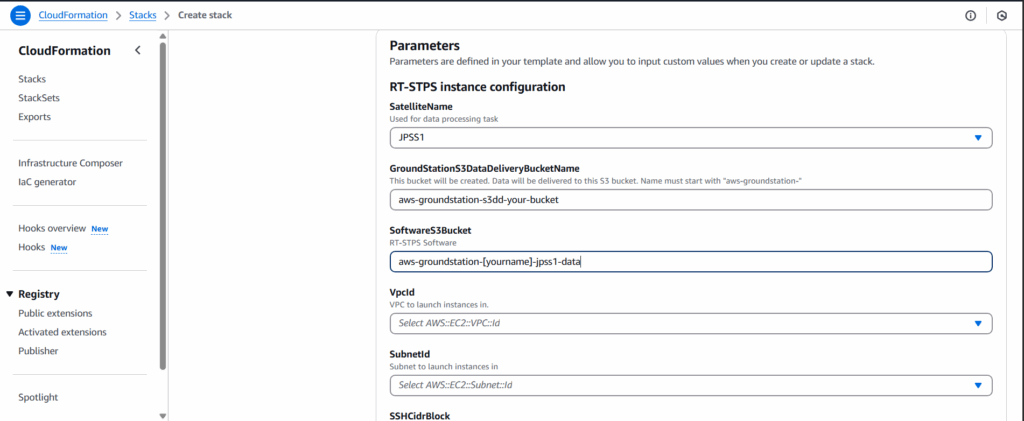
Then came the configuration screen. Here’s how I filled in the key parameters:
- Stack Name: gs-s3dd-jpss1
- Satellite Name: JPSS1
- Ground Station S3 Bucket Name: the one that starts with aws-groundstation-
- Software S3 Bucket: my software bucket name
- SubnetId and VpcId: I used a public subnet in a VPC I already had set up
- SSHCidrBlock: I used my public IP with
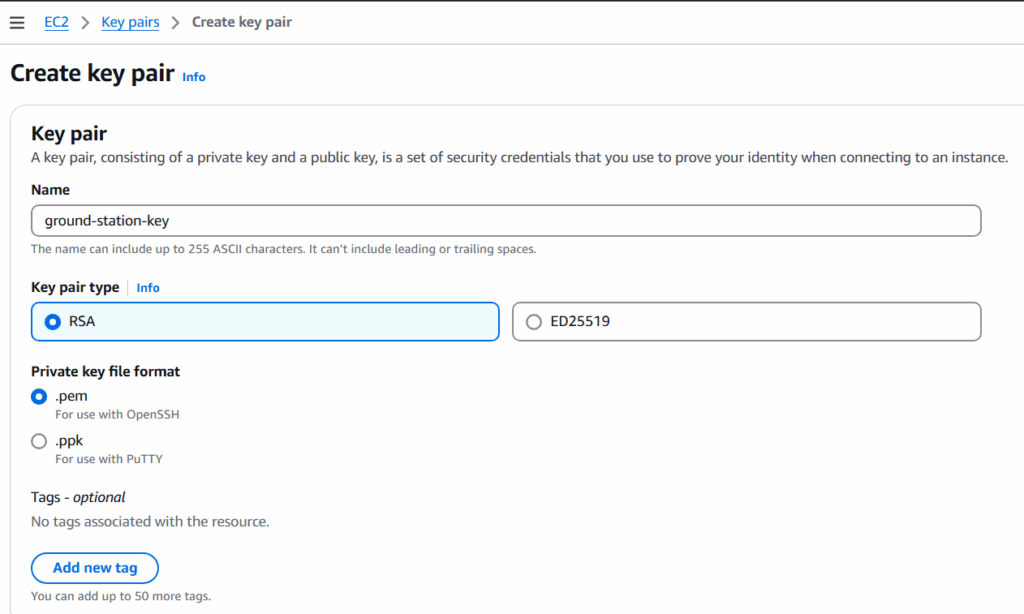
/32at the end (you can find yours at whatismyip.com) - SSH Key Name: An EC2 key pair I already had
- Notification Email: My email so I could get alerts
After clicking Next and then clicking on Create Stack, the resources started deploying. A few minutes later, I received an email asking me to confirm my subscription to an SNS topic. This is what lets AWS send you notifications after each processing stage which is super handy.
Step 4: Setting Up IPOPP
Once the RT-STPS part was live, I moved on to work on the IPOPP instance. Just like before, I created another CloudFormation stack. This time I used the ipop-instance.yml template from the repo.
The setup process was similar:
- Stack Name: gs-ipopp-jpss1
- Satellite Name: JPSS1
- Receiver Stack Name: The name I used for the RT-STPS stack
- Data Bucket and Software Bucket: The same ones I created earlier
- Instance Type: I used c5-xlarge which is suitable for most workloads
- IPOPP Password: I created a strong password that would also serve as the VNC login
- Vpc/Subnet/SSH Info: Same setup as before
Once again, I got an email to confirm the SNS topic. After doing this step for the first one, this step seemed much easier. 🙂
Step 5: Connecting to IPOPP via VNC
After I launched the IPOPP stack through CloudFormation, AWS automatically created an EC2 instance for the IPOPP processing node. During the stack setup, I had to provide:
- A key pair name (from EC2) so I could access the instance
- My IP address with
/32for secure access (found via whatismyip.com) - A strong IPOPP password which would be used to log into the desktop environment via VNC
Once the stack finished deploying, IPOPP started installing itself on the EC2 instance — no commands from me. But because IPOPP’s configuration dashboard is a GUI app, I needed to connect to the instance using VNC to finish setup.
In the AWS Console, I went to the EC2 service, found the running IPOPP instance, and copied its public IP address. I then used TigerVNC Viewer, pointed it at localhost:1, and connected via the tunnel set up by my system (some setups may use PuTTY or native SSH tunneling depending on the OS, I used the simplest method for my environment).
Once I was in, I saw a full desktop environment. I opened a terminal (like you would in a remote desktop session), and ran the IPOPP dashboard:
~/drl/tools/dashboard.sh $This launched a GUI that let me configure the SPAs (Software Processing Algorithms).Inside the IPOPP dashboard, I clicked on Mode – IPOPP Configuration Editor to access the processing settings. The first thing I did was set the projection type to Stereographic, which is commonly used for polar-orbiting satellite data like JPSS1. Then, under the JPSS-1-VIIRS tab, I enabled all the available SPAs (Software Processing Algorithms) to make sure I’d get the full suite of Level 2 data products, including RGB imagery, fire detection, and surface temperature. To keep processing time down, I went into the JPSS-1-ATMS/CrIS/OMPS tab and disabled all the SPAs there since I wasn’t planning to use those instruments. After that, I saved and the instance was ready to start processing as soon as data came in. Once that was done, IPOPP was ready. I logged out of the VNC session and returned to the AWS Console.
Step 6: Scheduling a Live Contact
Now came the fun part, scheduling an actual satellite contact! I went to the Ground Station Console by searching for Ground Station, clicked on Contacts, and hit Schedule Contact. From there, I selected JPSS1 as the satellite and chose the mission profile that had been created earlier during the CloudFormation setup. After picking an available time slot, I confirmed that the correct S3 recording configuration was selected, the one pointing to my aws-groundstation- data bucket. Once the contact was scheduled, I didn’t have to do anything else. The system is designed to handle the rest automatically, with a CloudWatch event triggering the data pipeline as soon as the satellite begins its downlink.
Conclusion
This entire project gave me a front-row seat to how AWS Ground Station works. I was able to go from zero to processing real satellite imagery with no hardware, no physical antennas, just cloud-native infrastructure. If you’re curious about space data, cloud automation, or just want to build something that feels like science fiction, I highly recommend giving this a shot. It was a fun experience, and I had to perform many searches to find out how to follow all the directions in the repo using only AWS console. I’ve found that I really enjoy working with AWS, and I’m already planning more projects to explore what else is possible in the cloud.
Are you planning on building a ground station in AWS or have built something similar? I would love to hear about it and see some pictures!